Note: You cannot use the glovebox until you have been formally trained by Dr. Daley and he has signed-off on your use of the box.
Overview: ("click here if you want to go straight to the general rules and glovebox operation directions)
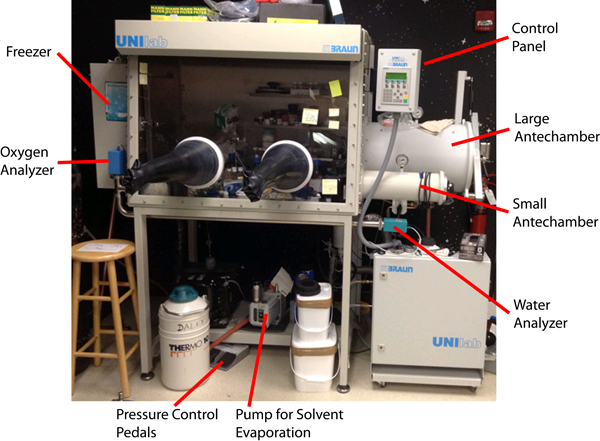
The glovebox is a larger apparatus that has a large working area ("the box") that is kept under and inert atmosphere. The idea is that one can perform air- and moisture-sensitive reactions using techniques one would use if the reaction was not sensitive to air or water. To do this, conventioal labware are used in the box including: (i) a stirplate, (ii) a balance, and (iii) a ring stand and clamps. One drawback is the lack of dexterity owing to the use of the large and thick glovebox gloves. However, with practice and patience, one can become very adept at performing a variety of tasks inclduing weighing and transferring small amounts of materials. Furthermore, you are likely to develop creative ways of accessing items beyond the reach of the gloves with the use of tongs and/or other items found in the glovebox. Of note, scratch your nose or other itch before you begin because you do not want to be caught trying to scratch your nose with your hand in the gloves - although it is a funny sight.
Even though the box is sealed and the atmosphere is circulated over a catalyst to keep it inert, there are still precautions that must be taken when working. Cross contamination of samples due to poor technique is problematic in particular when using volatile compounds and/or solvents. There are two common styles of use of gloveboxes:(i) one where the box is used solely to store, weigh, and transfer air-sensitive reagents without using any solvents or volatile liquids, and (ii) one where the former operations are performed as well as the use of solvents and performing of reactions that would be carried out using Schlenk techniques. Our glovebox is generally only used for the setup stage and product transfer stage of reactions (weighing compounds, transferring them to flasks or vials, dissolving them in solvent, etc.). However, on occaisson it can be used to perform entire synthetic operations including reactions in solvents, work-up, and preparation of samples for spectroscopy.
Not all reagents and solvents are acceptable for use in the glovebox. The "box atmosphere" is usually continuously deoxygenated over a copper catalyst. Certain volatile chemicals such as halogenated compounds and strongly coordinating species such as phosphines and thiols can be problematic because they irreversibly poison the copper catalyst. Thus, in general we try not to use these in the glovebox and when we do it is for a minimal amount of time and the materials are immediately removed from the box as soon as possible. Please remember this as the copper catalyst is expensive and thus we do not want to have to frequently replace it! Always consult Dr. Daley when using the glovebox to ensure it is maintained in top condition.
If at any time you notice an error on this page or if you have any questions, please contact Dr. Daley.
1. Standard Settings and changing settings on the glovebox: To change glovebox settings, you use the control panel keypad located on the upper right of the box. The only settings you should be changing are (i) the light setting (on or off), (ii) the box pressure limits (settings for when using the box and when it is idle), (iii) the circulation settings (when using Difficult Chemicals and Solvent or an air-leak is found in the box), or (iv) turning on/off the oxygen and water sensors. Before you think about changing a setting, you need to know the Standard Settings, which are listed below along with what can/should be changed when using the box.
Glovebox light: (i) when not in use - OFF; (ii) when in use - ON
Glovebox pressure limits: (i) when not using the box - lower pressure set to 5 psi and upper pressure set to 10 psi; (ii) when using the box - lower pressure set to 3 psi and upper pressure remains set to 10 psi. If the glovebox pressure drops lower than atmospheric pressure too quickly, the box may not be able to compensate quickly enough, resulting in the possibility that ambient air could enter the box and thus raise the oxygen levels. Also note that if you are working and you hear the box constantly purging and filling it means you are likley (i) moving too quickly causing the pressure to raise or lower over the limit settings, or (ii) the settings on the box are too narrow (i.e. you do not have it set to 3 and 10 psi), or most likely (iii) you are not taking care to correlate the movements of your arms: when you reach in farther with one arm, you should be pulling the other one out slightly to compensate and keep the overall box pressure constant.
Glovebox circulation: this is to remain ON at all times except the following circumstances.
(i) When using a Difficult Compound or using solvent the circulation should be turned off to protect the catalyst and box in general. Please view the specific details of how to work with these compounds below (click here to get there faster).
(i) When a hole/leak is found in the glovebox the circulation should again be turned off to protect the catalyst and box in general.If a leak is found, immediately turn the circulation off (simply press the Circulation Button on the control panel until the green light is off) and then immediately contact Dr. Daley. Do not use the glovebox!
Glovebox oxygen and water sensors: thess are to remain ON at all times except the following circumstances.
(i) When using a Difficult Compound or using solvent the circulation should be turned off to protect the catalyst and box in general. Please view the specific details of how to work with these compounds below (click here to get there faster).
(i) When a hole/leak is found in the glovebox the circulation should again be turned off to protect the catalyst and box in general.If a leak is found, turn off the analyzers. To do this press ENTER on the control panel followed by the F2 key to select Function menu. You should see choices on the display screen with F1 - ANALYZERS being one choice. Click the F1 key and the analyzers ON/OFF indicator should read OFF on the display. Once done, immediately contact Dr. Daley. Do not use the glovebox!
2. Procedure in case of leak/hole found in box:
(i) Turn off the circulation to protect the catalyst.
(ii) Turn off the oxygen and water analyzers.
(iii) Contact Dr. Daley.
(iv) Fill in the glovebox logbook.
3. Enter and exit the box slowly: The box is not perfect, there are small holes that let ambient atmosphere
into the box. Therefore, the box should always be kept under a positive pressure. To change glovebox settings, you use the control panel keypad located on the upper right of the box. The settings to be used are: (i) when not using the box - lower pressure set to 5 psi and upper pressure set to 10 psi; (ii) when using the box - lower pressure set to 3 psi and upper pressure remains set to 10 psi. If the glovebox pressure drops lower than atmospheric pressure too quickly, the box may not be able to compensate quickly enough, resulting in the possibility that ambient air could enter the box and thus raise the oxygen levels. Also note that if you are working and you hear the box constantly purging and filling it means you are likley (i) moving too quickly causing the pressure to raise or lower over the limit settings, or (ii) the settings on the box are too narrow (i.e. you do not have it set to 3 and 10 psi), or most likely (iii) you are not taking care to correlate the movements of your arms: when you reach in farther with one arm, you should be pulling the other one out slightly to compensate and keep the overall box pressure constant.
4. Using the Antechamber (port): Reduce the amount of time the antechamber is left open by having all items you wish to bring in the box ready! Also, if someone else is using the antechamber, check with that person before using the antechamber.
(a) The antechamber is to be kept under vacuum at all times (except for
putting things in the antechamber or removing them from the antechamber). This is done for the following
reasons: (1) It requires the glovebox user to refill the antechamber prior to opening the door as a defense against contasminating the glovebox atmosphere with air/water (i.e. opening the antechamber to the glovebox environment when it may have last been openned to the room atmosphere) and (2) it prevents leakage of outside air into the glovebox. Note that while the antechamber is to be left under vacuum when not in use, it should be static and not dynamic: i.e. once you have used the valve knob (labeled H1 for the small antechamber and H2 for the large antechamber) to put the antechamber under its highest vacuum setting, you return the valve knob to the "off" position.
Evacuating the antechamber should be the first thing you do after closing the antechamber door.
MAKE IT A HABIT as it is orders of magnitude better to accidentally evacuate the
antechamber and have to waste a little nitrogen refilling it than it is to forget to evacuate the
antechamber. Even if you are coming back out of the box in 5 minutes, EVACUATE THE ANTECHAMBER!
(b) Short Cycles are Inexcusable. We use five 5-minute vacuum cycles on the small ante-chamber and five 20-minute cycles on the large antechamber to pump materials into the box, with refilling the chamber only halfway (i.e. to the x psi mark on the manometer: labeled M1 and M2 for the small and lagre port, respectively) between cycles. The main reason we do this is because cycling the antechamber removes more oxygen and water from the antechamber than would a single cycle. Never, ever go into the box using less than 5 minute cycles!!! Even if you only want to bring stuff out of the glovebox. There are NO circumstances where short cycles are justified.
If you are bringing in Kim wipes or other porous materials (Celite, silica gel, etc) you must bring do the normal set of cycles but on the last cycle leave it under vacuum for a minimum of 12 hours. See "How to prepare samples to bring in the glovebox" below for more details.
5. Proper Glovebox Logbook Use: Anytime you use the antechamber, record it in the logbook located on top of the glovebox. This is the best way to prevent atmosphere contamination. These must be accurate! You must record the date, time, item(s)
brought in (or out), whether you used a solvent, and what the oxygen and water levels were before and after usage.
Check the logbook before pressurizing the antechamber. The log book also provides record of usage making it easier to
troubleshoot and correct any problems.
Keep it Clean: Return the glovebox better than when you found it.
LABEL EVERYTHING OR IT GETS THROWN AWAY!
Pipet Tips are Brittle! They break extremely easily. Broken glass damages the gloves and contaminates
materials.
No pipets are to be left lying around. Fresh, unused pipets are to be in the glass beaker with their narrow end pointing up. Used pipets are to be in the metal container with their narrow end pointing down. If fresh pipets are running low please bring in a new set (oven dried for 12 h). If the used pipet metal container is full, bring it out of the box, empty the used pipets into the glass waste, and then return the metal container to the glovebox.
Store Vials Properly: Loose vials on the floor clutter an already limited work space. Please store all loose vials in the large, labeled crystallization dish. Vials that contain your samples must be stored on the shelves in one of the sample vial trays. If the trays are full, in consultation with Dr. Daley, remove unnecessary vials to make room or get a new tray. If we are running low on vials in the box, replace them with ones from the oven and store them in the label crystallization dish.
Waste Handeling: All waste should be immediately removed from the box! If you use a chemical or solvent and leave the
waste lying around you are still contaminating the box atmosphere with whatever you used. We have a ziplock bag for used Kimwipes, etc. and a glass waste bottle for solvent waste. Each of these must be removed from the box after you have used it or if multiple people are using the box in one day, then the waste can be removed when the last person using the box is leaving for the day.
Waste solvent bottle: is to be transferred to the solvent waste bottle in the main lab, the waste bottle is then rinsed with acetone, and dried in the oven overnight. The waste bottle is then brought back into the box the following day.
Ziplock contents: are to be dumped in the appropriate place (solid waste container, etc.) and then the ziplock bag is to be returned to the small antechamber and cycled five times and then left under vacuum overnight. In the morning it is brought into the box.
Used pipet metal container: when full, bring it out of the box, empty the used pipets into the glass waste, and then return the metal container to the glovebox using the standard technique of five cycles.
Check the Balance: They are sensitive instruments. When they are not level, the weights they read are not accurate. The floor of the glovebox is uneven. When you move the balance, it is likely to not be level. If you want the weights you record to have useful physical meaning, then you don't want this. Before weighing make sure the balance is leveled by looking at the oil bubble leveler on the back of the balance (you will likely need a mirror for this). Keep the balance door closed at all times! This helps to prevent miscellaneous dirt from contaminating the balance which, of course, affects the weights you record.
Open Containers: Open solvent bottles, reactions (including venting with a needle stuck in the septum) are very bad in the glovebox because the atmosphere saturates in solvent vapors. This then leads to the catalyst bed becoming saturated in solvent vapors, which leads to a shorter catalyst lifetime (remember the catalyst costs a lot!). Also, solvent contamination will be a problem (e.g. diethyl ether in the NMR specturm of your reaction that never used diethyl ether ... guess where it came from!). Therefore, the box must be purged after usage of solvents or volatile chemicals (not including amines, phosphines, thiols, etc. "Dealing With Troublesome Chemicals" below for details on these).
Needles are Sharp: They are the single largest hazard to the gloves. If you want to use a septum with a needle through it to dry something under vacuum, please don't push the needle all the way into the septum as the needle will stick out past the end of the septum, just begging for a glove puncture.
1. Turn on the external vacuum pump to evacuate the system.
2. Add liquid nitrogen to the Dewer trap. Fill it all the way up and refill it to the top as necessary when solvent is being pumoped off. It should never go lower than 2 inches from the top.
3. Open the green valve at the inside back-right of the glovebox to open the hose in the glovebox to the vacuum/trap.
4. Place the hose on the side-arm flask to be evacuated and as you would on the Schlenk line, and with the side-arm flask stopcock closed to the hose, open the glass stopcock of the vacuum line from the glovebox hose to evacuate the line up to the flask. NEVER HAVE THE GLASS STOPCOCK OF THE GLOVEBOX HOSE OPEN WITHOUT BEING CONNECTED TO THE ITEM THAT IS TO BE EVACUATED!
5. Now you are ready to go! Slowly open the stopcock on the side-arm, while stirring the solution, to evaporate the solvent.
6. Once you have removed all the solvent to the point you desire, close the stopcock valve to the side-arm AND the glass stopcock of the glovebox connection. Note: DO NOT LEAVE THE ROOM WHILE THE EXTERNAL VACUUM PUMP IS ON!
7. Remove the hose to the side-arm and then slowly open the side-arm stopcock to re-pressurize the flask.
SHUTDOWN. Once you are done using the vacuum (or the trap is full), close both valves inside the glovebox to the vacuum hose (green and glass stopcock valves). Disconnect the hose on the trap to the vacuum pump and then turn off the pump. Disconnect the hose from the trap to the glovebox line and then remove the trap and empty the contents to the waste bottle in the our Main Lab.
Note: DO NOT LEAVE THE PUMP ON IF: you are not using it or the trap is not filled with liquid nitrogen when you are using it (the trap contents will all end up in the pump oil).
VIDEO HERE and/or Pictures
1. Shut off the blower and close off the catalyst bed. This is done by hitting the "Circulation" button on the panel attached to the upper right side of the glovebox (P1) so that the green light is off. When you switch it off you will immediately hear a winding down of the fan from the blower. If you do not hear it, stop using the box and contact Dr. Daley immediately as there could be a serious problem.
2. Use the chemicals as required taking care to be as quick as one can be while being safe and clean.
3. After using these troublesome compounds, reseal the bottles/vials tightly with black tape and/or parafilm.
4. Purge the box. Change the pressure settings of the box to a high of 14 psi and a low of 10 psi, changing the high setting first. Use the wrench to open the screw valve port on the left front side of the glovebox and remove the screw. Place the purge septum adaptor over the open screw port. Remove the protective septum from the inside openning to the screw port. At this point the box will begin purging. Let the box purge for a minimum of 15 minutes (ideally go for about 30 minutes). Once the purging is completed, place the protective septum over the inner screw port opening, replace the purge septum adaptor with the screw, and tighten the screw snuggly - do not over-tighten it as this will cause damage. If you are unsure, please ask Dr. Daley for help.
5. Turn the blower back on by pressing the "Circulation" button until the green light is on. Again, you should hear the blower fan start up. If you do not, please contact Dr. Daley immediately.
6. Material that came into contact with these troublesome compounds must be removed from the box immediately. Everyone is responsible for their own trash.
(i) When bringing an empty flask into the glove box: take it directly from the oven to the glovebox (put a stirbar that has also been in the oven overnight if needed) antechamber along with a sepctum. Do not seal the flask with the septum, just place the septum next to the flask in the antechamber and then use the purge-fill cycles to bring the equipment in.
(ii) When bringing a sealed flask that contains no solvent into the glove box: simply ensure that it has been completely evacuated on the Schlenk line by keeping it under vaccum for at least 1 minute and then sealing the flask. Examples of these flasks would be reaction flasks that have had solids in them that were (i) starting materials massed-out in the lab and then placed in then cycled on the Schlenk line or (ii) reaction products/residues that remain after filtration or evaporation of the solvent on the Schlenk line.
(iii) When bringing a sealed flask containing solvent into the glove box (e.g. Diethyl ether): you must be very careful here! You can only do this after you have been formally trained by Dr. Daley. The step to perfrom are:
1. Make sure the flask is not more than 3/4 way full with solution,
2. Ensure the solution is under inert atmosphere (see De-oygenating Solutions for details),
3. Place the flask under a partial vacuum on Schlenk line. Care must be taken here, especially for low-boiling solvents, to ensure that you get reduce the pressure sufficiently without evaporating all your solvent. For low-boiling solvents, a general rule of thumb is to open the flask to vacuum, with stirring, for 30 seconds to 1 minute and then selaing it. For high-boiling solvents you can get away with a longer time as evaporation will be minimal.
4. Secure the septum of the flask with a thick rubber band (warpped tightly around the neck) and place a tiny amount of grease over the needle holes in the septum if there are any.
5. Place the flask carefully in the antechamber and perform the regular purge-fill cycling with one modification. When going under vacuum (and refilling) go very slowly and carefully listen for any popping sounds. A loud pop (although it could be quiet but should be distinctive) likely indicates the flask and/or septum has come off the flask and your solution is now going all over the antechamber and into the vacuum line! If you hear a pop, IMMEDIATELY AND QUICKLY TURN THE VALVE TO REFILL THE ANTECHAMBER! Then open the door and clean out the mess thoroughly. Do not use the box - close the door to the port but DO NOT place it under vacuum - contact Dr. Daley.
2. Patching Holes: If you poke or notice a hole in the glove box (typically the in a glove) stop using the glovebox and contact Dr. Daley immediately. Holes on the gloves can be fixed with a "Bike Tire Repair Kit" in many cases but only Dr. Daley can do this. If the hole is in a glove and you cannot find Dr. Daley (or Dr. Clark or Dr. Citeau) then please use the protective glove port screw cap to seal the port of the glove with the hole. The cap is located on the top shelf - you pull it into the glove port opening with your hand on the knob. Once in place you turn the knob until the port is sealed. The glove will immediately deflate but do not worry as the rest of the box is protected. Hoever, do not use the box until the glove has been fixed.