
Need Help? Add your name to the Lab 14 Help Queue! If you have a short question, you may also ask it in the CampusWire lab-sessions chatroom.
In this lab session you will write a couple of Critters classes to give you practice for PSA #9. Critters was originally developed in Java at the University of Washington by Stuart Reges and Marty Stepp, but USD is the first to do it in Python!
Unfortunately, there is an issue in the macOS version of python you installed at the beginning of the semester. This results in some weird visual errors when running the Critters simulator.
Luckily, there is an easy fix, which you should do now (even if you aren’t the driver for this lab). Simply download and run this new Python installer. After it has installed, make sure you close VS Code and reopen it, otherwise it may not recognize that a new version of Python was installed.
To get started, we will need to use VS Code to clone a repository with some starter code. You and your partner should do these steps on one of the classroom laptops (i.e. use pair programming).
Open the Command Palette in VS Code and use the “Git: Clone” command.
When prompted, enter the following for the repository URL: https://github.com/usd-cs/comp110-fa20-lab14.git
Click the “Open Repository” button in the pop-up. In this repository you will find but a single Python source code file.
Locate the “lab14_critters.py” file, and open it in VS Code now.
The starter code contains several classes that implement a graphical simulation of a 2D world with many animals moving around in it. You will write a set of classes that define the behavior of those animals. Different kinds of animals move and behave in different ways. As you write each class, you are defining those unique behaviors for each animal.
The critter world is divided into cells with integer coordinates. The world is 60 cells wide and 50 cells tall. Like images, the upper-left cell has coordinates (0,0). The figure below shows what the world looks like.
You can start the simulator now by running the lab14_critters.py file in VS Code. Do so now.
Q1: What types of critters are present in the Critters world? Note that this is different for the lab than it will be the for PSA/image shown above.
At the bottom of the Critters window you will find some “control” button.
The “Start” and “Stop” buttons work as you might expect: the start and stop the simulation. There is also a turn speed control at the bottom that you can use to control how fast each turn goes. Feel free to play around with it for a bit: it’ll be pretty boring as 2 of the 3 critters aren’t implemented yet. When you are done, make sure you stop the simulation.
Q2: Click on the “Tick” button several times. What does this button do?
Every critter has a fixed set of methods that it will use to define its specific behavior. Those methods are:
def eat(self)
When your animal encounters food, our code calls this on it to ask whether it wants to eat (True) or not (False).
def fight(self, opponent)
When two animals move onto the same square of the grid, they fight. When they collide, our code calls this on each animal to ask it what kind of attack it wants to use in a fight with the given opponent. The options for attacks are: Attack.ROAR, Attack.POUNCE, Attack.SCRATCH, and Attack.FORFEIT.
The opponent parameter is the string representation of the critter you are fighting (e.g. “M” for cow).
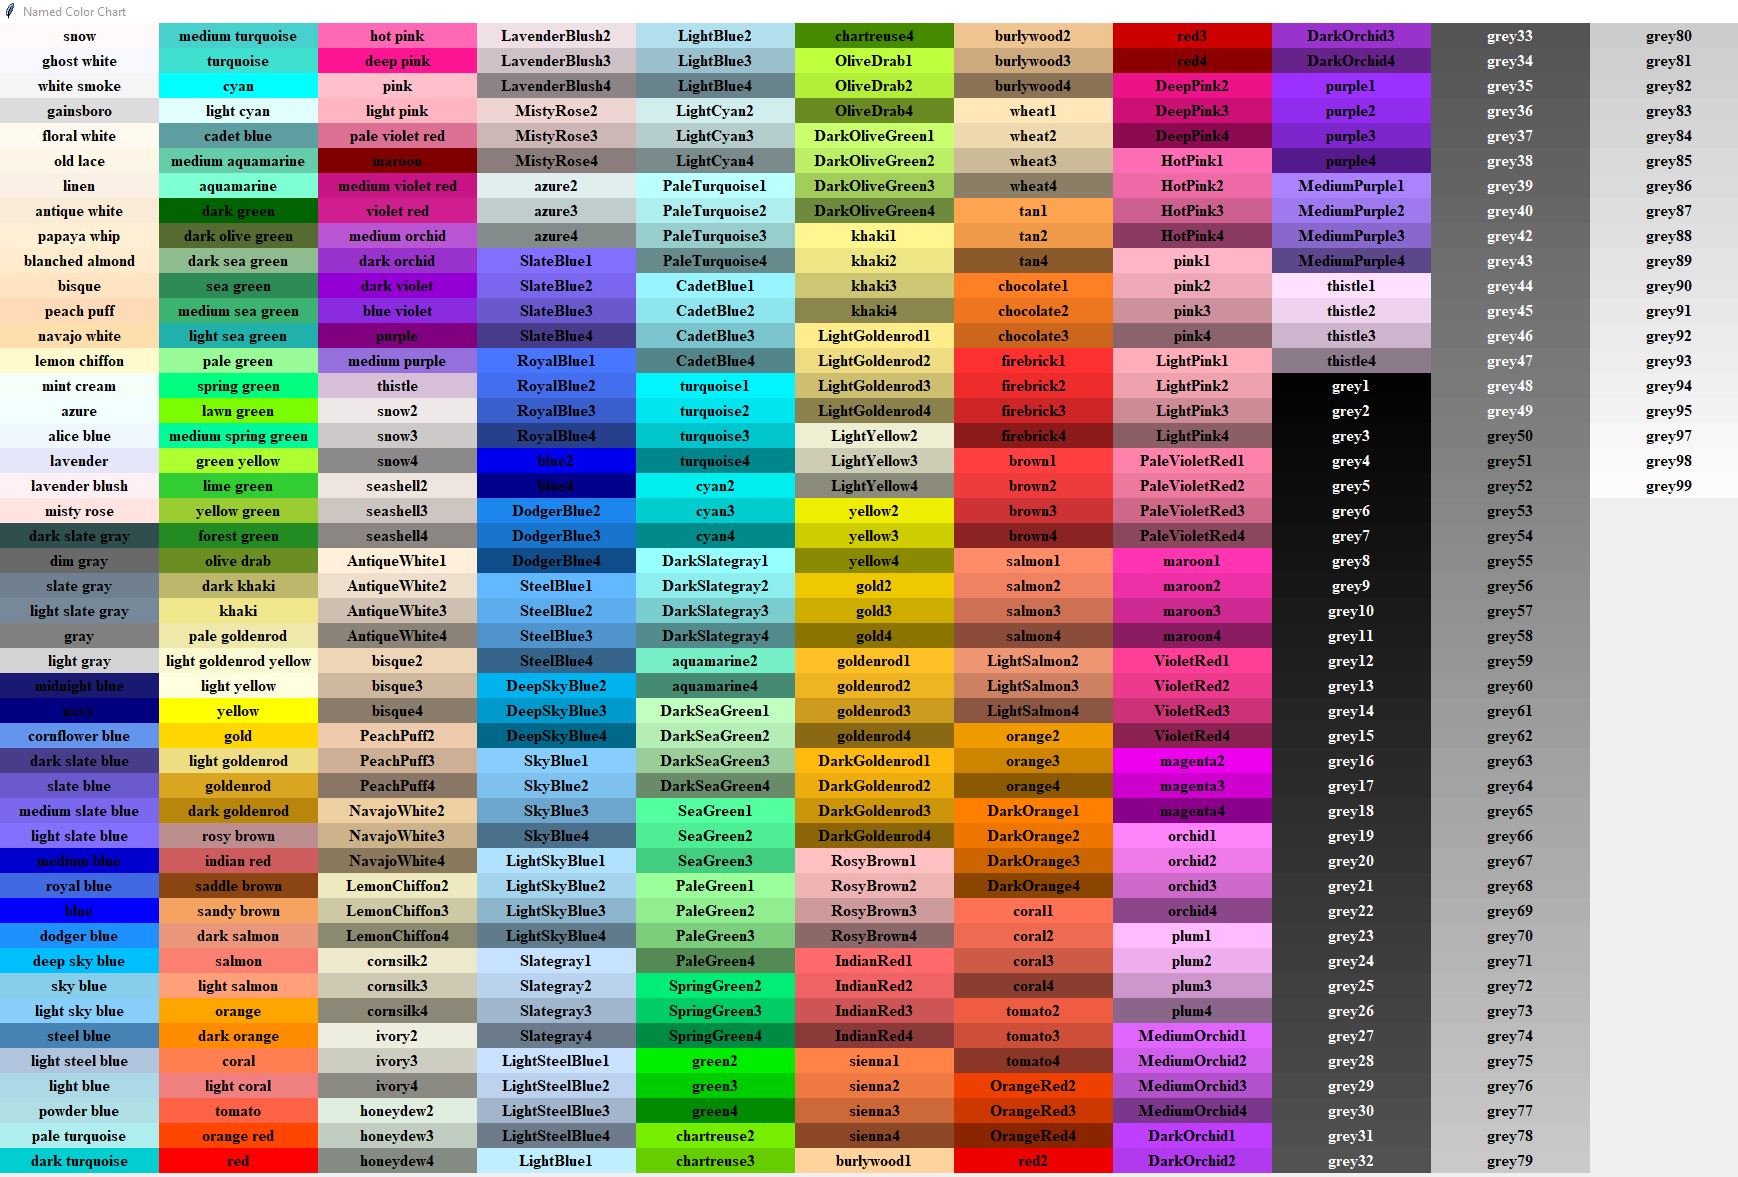
def get_color(self)
Every time the board updates, our code calls this on your animal to ask it what color it wants to be drawn with. This color will be a string (e.g. “black”) that comes from the following list of possible color names.
def get_move(self, neighbors)
Every time the board updates, our code calls this on your animal to ask it which way it wants to move (assuming it is not sleeping or gestating). The options for movement are: Direction.CENTER, Direction.NORTH, Direction.EAST, Direction.SOUTH, and Direction.WEST.
The neighbors parameter will be a dictionary that maps a direction (e.g. Direction.SOUTH) to a string representation of the critter in that direction (e.g. “B” for a bear). If there is no critter in that direction, the value will be None. For example, if there is a cow to the north and a bear to the south, you the dictionary would be: {Direction.NORTH: 'M', Direction.EAST: None, Direction.SOUTH: 'B', Direction.WEST: None}.
As with all dictionaries, you can use either the [] operator (e.g. neighbors[Direction.NORTH]) or use the get method (e.g. neighbors.get(Direction.WEST))to access the values in the dictionary.
def __str__(self)
Every time the board updates, our code calls this on your animal to ask what letter it should be displayed as. This method is used for the parameters for both the fight and get_move methods. This must be a single character (e.g. ‘B’, or ‘L’, or ‘T’).o
Note that a critter will go to sleep for a few turns after eating some number of times. This is indicated by a “ZZZ” appearing over the critter. Similarly, Critters will mate if they enter the same location as a Critter of the same type. This is indicated by a "<3" appearing over the critter. In both of these cases the critter cannot move and will always lose if another Critter initiates a fight with it.
The starter code contains an implementation of the Cow class we looked at in lecture, with a few tweaks. Find the Cow code in the lab14_critters.py file and answer the following question.
Q3: Describe the following behaviors of the Cow:
The starter code has placeholders for two other classes: Sloth and ScaredCat. We are going to work on those now.
The following describes the expected behavior of the Sloth class.
def __init__(self, location, speed)
location you were given. Calling your parent’s constructor (i.e. __init__) is discussed in lecture, and as demonstrated in the Cow class.True (sloths need their energy!)Attack.SCRATCH)'S'The Sloth constructor accepts a parameter representing the speed of the Sloth For example, a speed of 3 means that the sloth will move east once every 3 turns. The simulator will pick a random number between 3 and 5 for this speed.
After you are done implementing all of the methods, test it out by running the simulator again. You’ll probably want to use the “tick” button to see that each sloth is moving only once every speed turns.
IMPORTANT: Once you have finished and tested this class, get the instructor or lab assistant’s attention to demonstrate.
The following describes the expected behavior of the ScaredCat class.
def __init__(self, location, speed)
location you were given. Calling your parent’s constructor (i.e. __init__) is discussed in lecture, and as demonstrated in the Cow class.False (it’s too busy being scared to eat.)Direction.CENTER).'!' (it’s scared!!!)'red')Once again, run the simulator to test that your ScaredCat is working as expected. As before, you will likely want to use the “tick” button so you can focus on the behavior of one specific cat to make sure it’s working as expected.
IMPORTANT: Once you have finished and tested this class, get the instructor or lab assistant’s attention to demonstrate.
Before leaving lab, one of you should submit the following two files on Blackboard (in the “Labs” folder). Don’t worry if you didn’t get fully done with the lab: submit whatever answers you have and work on finishing up the lab later.
lab14_critters.py file. If you have trouble locating the lab14_critters.py file when submitting, you can right click on the file name in VS Code and select the “Reveal in Finder” (macOS) or “Reveal in File Explorer” (Windows 10).The other person in your group won’t submit any files; instead they should submit a comment saying with whom they worked (so I can give them credit).
For the rest of this lab period, you should start working on PSA #9 with your partner.